Managing Auto Attendant general settings with PowerShell
By Robert Dyjas on . Last edit: • Edit this post
Ever wondered how to manage the general settings of the auto attendant using PowerShell? You'll learn here!
Have you ever thought it would be useful to have scripts related to the auto attendant in your script folder? Are you tired of managing settings using your mouse and Teams Admin Center? Do you ever need to change more than one auto attendant at a time?
If you answered yes to at least one of the questions, you're in a good place. You'll find below the scripts for managing the general settings of the auto attendant.
Tip
This article is a part of the series about managing Teams call queues and auto attendants with PowerShell.
Part 1 - Automating Call Queue and Auto Attendant onboarding
Part 2 - Managing Auto Attendant general settings with PowerShell (this article)
Table of Contents
- Table of Contents
- Scope
- Prerequisites
- Preparation
- Changing the operator
- Changing the time zone
- Summary
Scope
What do general settings mean? You can find them under the section named General in auto attendant configuration wizard. In the article we will be going through these settings:
- Operator
- Time zone
Are you ready to go? Let's set the prerequisites and start!
Prerequisites
To go through the steps in this blog post, you need the following:
- Microsoft 365 environment with Phone System
- An account with at least Teams Communications Administrator and User Administrator roles
- PowerShell with Teams module installed. See installation guide
Preparation
For this article, we'll use a test attendant. Let's save its name to a variable:
$attendantName = 'ATT_TEST'Getting the identifiers
Next, we'll use PowerShell to pull the auto attendant object. We'll use Get-CsAutoAttendant cmdlet.
Tip
We can also get the identity from the Teams Admin Center. When we edit an auto attendant, id is the last part of the page URL:

Two of the parameters might be useful to get the identifiers of our object: Identity and NameFilter. Both parameters accept a string.
We will use NameFilter to get our object. We need to be careful though. Using NameFilter returns all objects matching the filter. For example, if our filter is Test, we'll get the objects with names:
- Test (this is desired)
- Test2
- NotTest
After the Get- cmdlets we'll add Where-Object at the end. This is to ensure that we only use the object with the exact name we provided:
$aa = Get-CsAutoAttendant -NameFilter $attendantName |
  Where-Object Name -eq $attendantName
We now have our object saved to the variable. Let's start modifying it!
Changing the operator
The first set of scripts will be about managing the auto attendant's operator.
The operator of an auto attendant is a callable entity. There is only one difference in comparison to other entities (person, voice app, or phone number). The difference is in the menu - there's a predefined voice command, which redirects to the operator. Other than that, operator is just another call destination.
Changing the operator to a person
In this example, we'll set Megan Bowen to be the auto attendant operator:
# Here we enter the User Principal Name
$operatorUPN = 'MeganB@contoso.com'

# We define callable entity using Identity
$operatorObjectId = (Get-CsOnlineUser $operatorUPN).Identity
$callableEntityPersonParams = @{
  Identity = $operatorObjectId
  Type = 'User'
}
$callableEntityPerson = New-CsAutoAttendantCallableEntity @callableEntityPersonParams

# We set the operator
$aa.Operator = $callableEntityPerson

# And we save
Set-CsAutoAttendant -Instance $aa
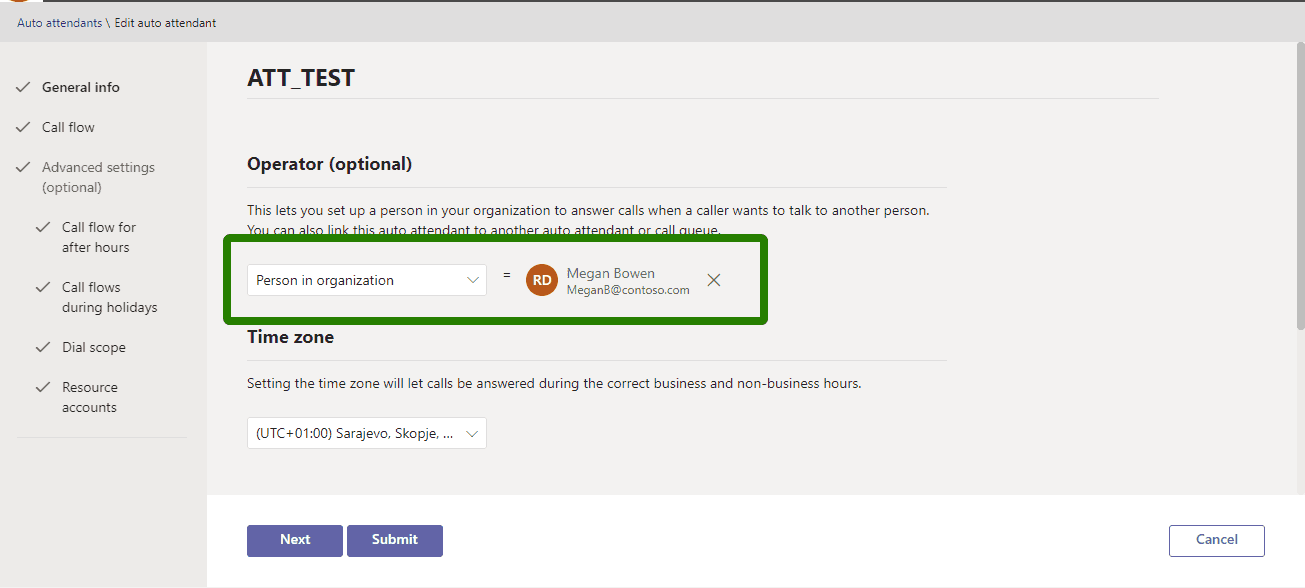
Next time we open the attendant in Teams Admin Center, we should see the operator set:

Changing the operator to the call queue
We can also set the group of people to act as an operator. We use a call queue for that.
In the example below we'll provide the ID of the existing call queue. Then we'll set it as an operator.
# Here we enter the call queue name
$operatorCallQueueName = 'CQ_TEST'

# We define callable entity using the resource account
$operatorQueue = Get-CsCallQueue -NameFilter $operatorCallQueueName |
  Where-Object Name -eq $operatorCallQueueName
$operatorQueueAccountId = $operatorQueue.ApplicationInstances[0]
$callableEntityQueueParams = @{
  Identity = $operatorQueueAccountId
  Type = 'ApplicationEndpoint'
}
$callableEntityQueue = New-CsAutoAttendantCallableEntity @callableEntityQueueParams

# We set the operator
$aa.Operator = $callableEntityQueue

# And we save
Set-CsAutoAttendant -Instance $aa
Warning
We might get the error saying New-CsAutoAttendantCallableEntity: Cannot bind argument to parameter 'Identity' because it is an empty string.
In that case, our call queue might not have the resource account assigned yet. We must create the resource account, assign it, and try again.
Changing the operator to the auto attendant
Using an auto attendant as an operator allows to define a workflow for contacting the operator. The procedure is similar to setting a call queue as an operator:
# Here we enter the auto attendant name
$operatorAutoAttendantName = 'ATT_RobTest'

# We define callable entity using the resource account
$operatorAttendant = Get-CsAutoAttendant -NameFilter $operatorAutoAttendantName |
  Where-Object Name -eq $operatorAutoAttendantName
$operatorAttendantAccountId = $operatorAttendant.ApplicationInstances[0]
$callableEntityAttendantParams = @{
  Identity = $operatorAttendantAccountId
  Type = 'ApplicationEndpoint'
}
$callableEntityAttendant = New-CsAutoAttendantCallableEntity @callableEntityAttendantParams

# We set the operator
$aa.Operator = $callableEntityAttendant

# And we save
Set-CsAutoAttendant -Instance $aa
Warning
We might get the error saying New-CsAutoAttendantCallableEntity: Cannot bind argument to parameter 'Identity' because it is an empty string.
In that case, our auto attendant might not have the resource account assigned yet. We must create the resource account, assign it, and try again.
Changing the operator to the phone number
The only callable entity which we haven't set is the phone number. Let's set it, too.
# Here we enter the number
# It must be in E.164 format
$operatorNumber = '+48123456789'

# We create the respective entity
$callableEntityNumberParams = @{
  Identity = $operatorNumber
  Type = 'ExternalPstn'
}
$callableEntityNumber = New-CsAutoAttendantCallableEntity @callableEntityNumberParams

# We set the operator
$aa.Operator = $callableEntityNumber

# And we save
Set-CsAutoAttendant -Instance $aa
Removing the operator
To remove the operator we need to nullify the property:
# We set the operator to $null
$aa.Operator = $null

# And we save
Set-CsAutoAttendant -Instance $aa
Changing the time zone
Microsoft provides a cmdlet to find out which time zones are supported by auto attendants. The cmdlet is Get-CsAutoAttendantSupportedTimeZone. We'll use it to find out the name of the specific zone we'd like to set.
In this example, I'll try to set the time zone used in Poland. It is UTC+1 and should have Warsaw in its name.
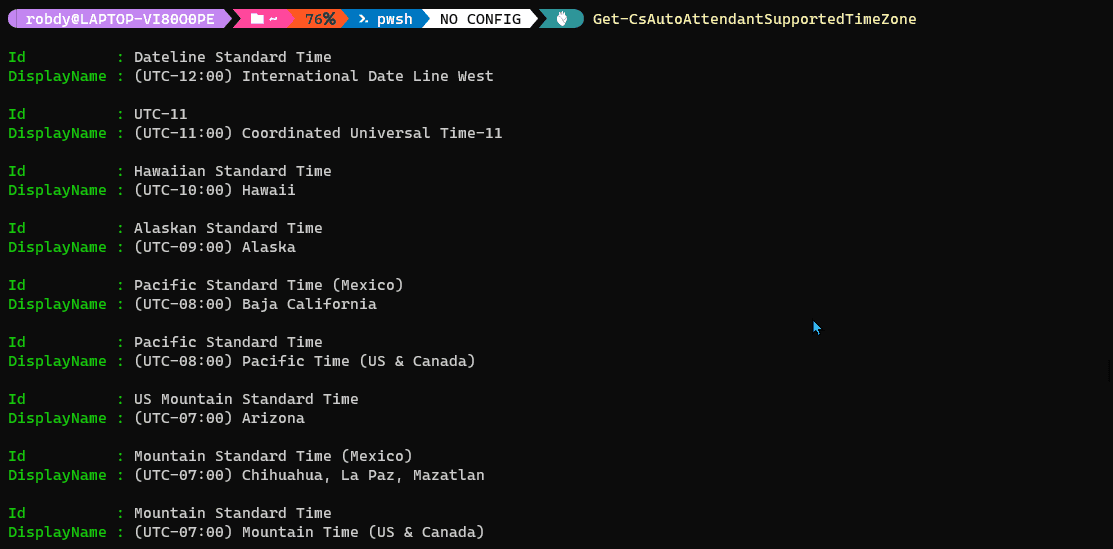
Let's run the Get-CsAutoAttendantSupportedTimeZone . We'll check the structure of the data returned:

As we can see, each entry has two properties: Id and DisplayName. We'll filter using the DisplayName. Then we'll use the Id and pass it to the auto attendant object.
We'll first try to filter using the hours' difference +01:00 and then based on the city name (Warsaw).
# By time difference
Get-CsAutoAttendantSupportedTimeZone |
  Where-Object DisplayName -like '*+01:00*'

# By city name
Get-CsAutoAttendantSupportedTimeZone |
  Where-Object DisplayName -like '*warsaw*'
Here's what is returned in both cases:

Now, when we know the identifier, we can pass it to the auto attendant object:
# Copying data from the filtering above
$timeZoneId = 'Central European Standard Time'

# Setting the object
$aa.timeZoneId = $timeZoneId

# And saving
Set-CsAutoAttendant -Instance $aa
Summary
In this article, we've learned how to manipulate the operator and the time zone of the auto attendant.
Do you see anything missing? Do you have something you need to learn about in that topic? Let me know in the comments section!